|
Size: 2816
Comment:
|
Size: 5529
Comment:
|
| Deletions are marked like this. | Additions are marked like this. |
| Line 1: | Line 1: |
| ===work in progress...=== | == About == This page describes how to perform seed-based functional connectivity (FC) analysis in FSFAST. This is an extension of the task-based analysis for which there is much more documentation. It may be worth your time to study some of the preprocessing and task-based analysis as found in [[http://surfer.nmr.mgh.harvard.edu/pub/docs/freesurfer.fsfast.ppt|FS-FAST powerpoint]] and the [[http://surfer.nmr.mgh.harvard.edu/fswiki/FsFastTutorial|FS-FAST tutorial]]. |
| Line 3: | Line 4: |
| ==About== Walkthrough: How to use FsFast and fcseed-sess for functional connectivity analysis |
*STEP 1: Unpack Data into the FSFAST Hierarchy using dcmunpack (run with -help for more documentation): |
| Line 6: | Line 6: |
| [[http://surfer.nmr.mgh.harvard.edu/pub/docs/freesurfer.fsfast.ppt|Functional Analysis with FS-FAST]] | Sample cmd: |
| Line 8: | Line 8: |
| *STEP 1: Unpack Data into the FSFAST Hierarchy using "unpackscmdir" | dcmunpack -src dicomdir -targ sessionid -fsfast -run 3 bold nii.gz f.nii.gz -run 4 bold nii.gz f.nii.gz |
| Line 10: | Line 10: |
| [[https://surfer.nmr.mgh.harvard.edu/fswiki/unpacksdcmdir| unpacksdcmdir]] | In this sample command... |
| Line 12: | Line 12: |
| 1.QA Check after unpacking A - Check unpacked data (time points, # of slices ..etc) B - Check FSFAST hierarchy in session folder |
* Have all fMRI dicoms for this subject in the dicomdir folder or subfolders under this folder * Arguement for "-targ" specifies output directory here called "sessionid". This should be unique to the subject (and visit if longitudinal). This is called the session folder. * -run 3 bold nii.gz f.nii.gz will unpack run 3 fmri to sessionid/bold/003/f.nii.gz * To get a list of runs, run dcmunpack -src dicomdir/subject/ALLDICOMS * Use "-fsfast" to generate fsfast hierarchy shown in the image below |
| Line 16: | Line 18: |
| *STEP 2: reconstruct anatomical data using # Reconstruction Anatomical using "recon-all all" 1.Set SUBJECTS_DIR 2.QA Check A - Check talairach transformation B - Check skull strip, white matter & pial surface C - Re-run "recon-all" if edits are made D - Check hierarchy of reconstructed anatomical data [[https://surfer.nmr.mgh.harvard.edu/fswiki/recon-all recon-all]] |
{{attachment:fsfast-hierarchy.jpg}} |
| Line 26: | Line 20: |
| 1.Make FSFAST basic hierarchy (only if data are not unpacked in FSFAST hierarchy) 2.Link to FreeSurfer anatomical analysis A - Make subjectname file in the session directory to link a subject's functional & structural data 3.Create a sessid file (text file with list of your sessions)in your Study DIR. 4.Create a Stimulus Schedule (Paradigm file) in bold folder (A "paradigm" file is a record of which stimulus was presented when & for how long. Each paradigm file has four columns: A - Stimulus onset time (sec) B - Condition ID code (0, 1, 2, ...) C - Stimulus Duration (sec) D - Stimulus Weight (usually 1) |
*STEP 2: Link to FreeSurfer anatomical analysis. This is done by creating a text file called sessionid/subjectname with the name of the FreeSurfer anatomical folder as created with recon-all and found in $SUBJECTS_DIR. |
| Line 36: | Line 22: |
| *STEP 3: Pre-process your bold data using preproc-sess [[http://surfer.nmr.mgh.harvard.edu/fswiki/preproc-sess|preproc-sess]] | |
| Line 37: | Line 24: |
| *STEP 3: Pre-process your bold data using preproc-sess [[http://surfer.nmr.mgh.harvard.edu/fswiki/preproc-sess preproc-sess]] # Preprocessing of fMRI Data () preproc-sess -s <subjid> -fwhm <#> 1.By default this will do motion correction, smoothing & brain masking 2.Quality Check (plot-twf-sess) 3.Examine additions to FSFAST hierarchy (in each run of bold dir): - f.nii (the raw data) - fmc.nii (motion corrected-MC) - fmcsm5.nii (MC & smoothed) - fmc.mcdat - text file with the MC parameters (AFNI) - mcextreg.bhdr - binary mask of the brain # Function-Structure Registration View unregistered tkregister-sess -s <subjid> -regheader) Run automatic registration spmregister-sess -s <subjid> Check automatic registration tkregister-sess -s <subjid> A - Make edits if needed using scale as the last resort Check talairach registration tkregister2 --s <subjid> --fstal --surf |
Sample cmd: |
| Line 60: | Line 26: |
| preproc-sess -s sessionid -fwhm 10 -surface fsaverage lhrh | |
| Line 61: | Line 28: |
| *STEP 4: Use fcseed-sess to generate time-course information for your chosen seed region (as well as nuisance variable signal). | By default this will do motion correction, masking, registration to the anatomical, sampling to the surface, and surface smoothing. The sampling is done onto the surface of the lh and rh hemispheres of fsaverage. Note that eventhough the time series data are sampled onto fsaverage, the FC seeds are derived from the indvidual anatomy as shown below. |
| Line 63: | Line 30: |
| *STEP 4: | |
| Line 64: | Line 32: |
| *STEP 5: Use mkanalysis-sess to setup an analysis for your FC data | There are two methods of deriving a seed region: |
| Line 66: | Line 34: |
| 1) To use a full-size Freesurfer parcellation from aparc+aseg.mgz, continue with STEP 5 on this page. | |
| Line 67: | Line 36: |
| 2) To split the full Freesurfer parcellation into multiple seeds ("split parcellation"), follow the [[FsFastFunctionalConnectivityWalkthroughSplittingSeeds |additional steps here]] - and resume with step 5 on this page... | |
| Line 68: | Line 38: |
| *STEP 6: Use selxavg3-sess to run the subject-level analysis | *STEP 5: Use fcseed-config to configure the parameters you wish to pass to your connectivity analysis. |
| Line 70: | Line 40: |
| Sample command: fcseed-config -segid 1010 -fcname mean.L_Posteriorcingulate.dat -fsd bold -mean -cfg mean.L_Posteriorcingulate.config |
|
| Line 71: | Line 43: |
| This example will use the FreeSurfer cortical segmentation for the left posterior cingulate (segID: 1010) as defined for this individual. For seed regions, we recommend generating the mean signal timecourse by using "-mean". Note that this does not perform any analysis, it just creates a text file with the configuration. | |
| Line 72: | Line 45: |
| *STEP 7: Use mri_glmfit or selxavg3-sess to run a group-level analysis | *STEP 5: Pass the config text file to fcseed-sess to generate time-course information for your chosen seed region (or for nuisance variable signal). {{{fcseed-sess -s sessionid -cfg mean.L_Posteriorcingulate.config}}} Sample cmd (mean waveforms for nuisance regressors, but PCA also possible with -pca): for white matter: . fcseed-config -wm -fcname wm.dat -fsd bold -cfg wm.config . fcseed-sess -s sessionid -cfg wm.config for ventricles + CSF: . fcseed-config -vcsf -fcname vcsf.dat -fsd bold -mean -cfg vcsf.config . fcseed-sess -s <session> -cfg vcsf.config *NOTE: Once a config file is created it may be used for multiple sessions *STEP 5: Use [[http://surfer.nmr.mgh.harvard.edu/fswiki/mkanalysis-sess|mkanalysis-sess]] to setup an analysis for your FC data Sample cmd: mkanalysis-sess -a <analysisname> . -surface fsaverage <hemi> -notask -taskreg mean.L_Posteriorcingulate.dat 1 -nuisreg vcsfreg.dat 1 -nuisreg wmreg.dat 1 -nuisreg global.waveform.dat 1 -fwhm 5 -fsd bold -TR <TR> -mcextreg -polyfit 5 -nskip 4 Note: if you do not want to regress out the global signal, then do not include it in the mkanalysis-sess command. *STEP 6: Use [[http://surfer.nmr.mgh.harvard.edu/fswiki/selxavg3-sess|selxavg3-sess]] to run the subject-level analysis outlined by the above mkanalysis-sess cmd. . selxavg3-sess -s <session> -a <analysisname> *STEP 7: Choose the contrast file (generated in each session's contrast directory) that you wish to analyze on a group level: # ces.mgz - contrast effect size (contrast matrix * regression coef) # cesvar.mgz - variance of contrast effect size # sig.mgz - significance map (-log10(p)) # pcc.mgz - partial correlation coefficient map *STEP 8: To continue with a group-level analysis, try one of the methods below: Method 1: *create fsgd file containing all sessions of interest *Concatenate contrast files using [[http://www.freesurfer.net/fswiki/mri_concat|mri_concat]] *Run group analysis using [[http://www.freesurfer.net/fswiki/mri_concat|mri_glmfit]] Should also be possible with: Method 2: *[[http://www.freesurfer.net/fswiki/Qdec|Qdec]] Should also be possible with: Method 3: *Concatenate with [[http://www.freesurfer.net/fswiki/isxconcat-sess|isxconcat-sess]] *Run group analysis using [[http://www.freesurfer.net/fswiki/mri_concat|mri_glmfit]] |
About
This page describes how to perform seed-based functional connectivity (FC) analysis in FSFAST. This is an extension of the task-based analysis for which there is much more documentation. It may be worth your time to study some of the preprocessing and task-based analysis as found in FS-FAST powerpoint and the FS-FAST tutorial.
*STEP 1: Unpack Data into the FSFAST Hierarchy using dcmunpack (run with -help for more documentation):
Sample cmd:
dcmunpack -src dicomdir -targ sessionid -fsfast -run 3 bold nii.gz f.nii.gz -run 4 bold nii.gz f.nii.gz
In this sample command...
- Have all fMRI dicoms for this subject in the dicomdir folder or subfolders under this folder
- Arguement for "-targ" specifies output directory here called "sessionid". This should be unique to the subject (and visit if longitudinal). This is called the session folder.
- -run 3 bold nii.gz f.nii.gz will unpack run 3 fmri to sessionid/bold/003/f.nii.gz
- To get a list of runs, run dcmunpack -src dicomdir/subject/ALLDICOMS
- Use "-fsfast" to generate fsfast hierarchy shown in the image below
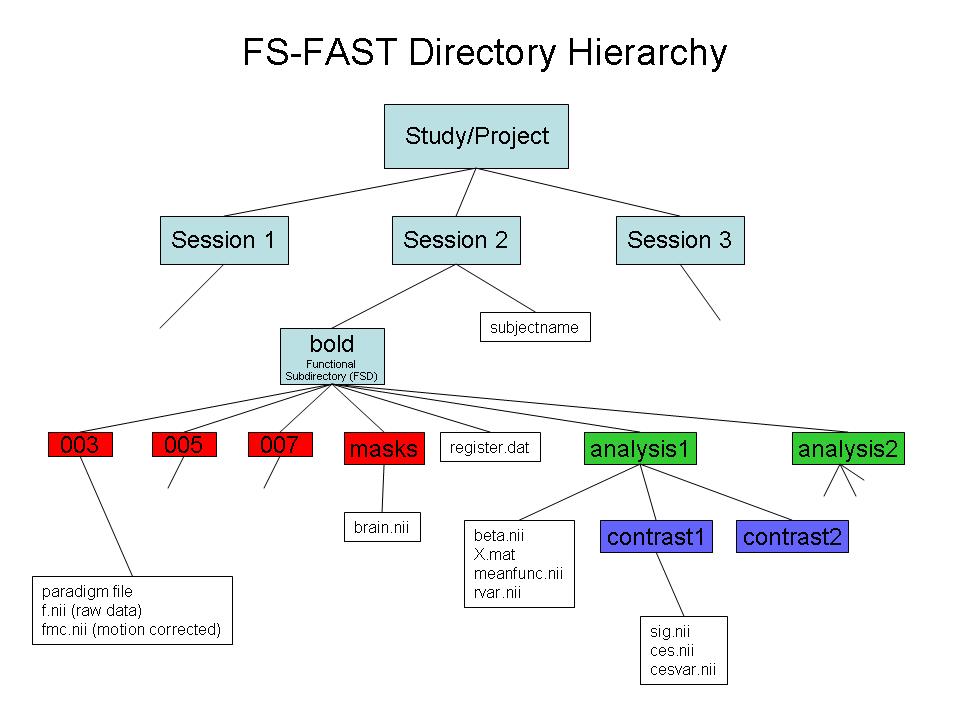
*STEP 2: Link to FreeSurfer anatomical analysis. This is done by creating a text file called sessionid/subjectname with the name of the FreeSurfer anatomical folder as created with recon-all and found in $SUBJECTS_DIR.
*STEP 3: Pre-process your bold data using preproc-sess preproc-sess
Sample cmd:
preproc-sess -s sessionid -fwhm 10 -surface fsaverage lhrh
By default this will do motion correction, masking, registration to the anatomical, sampling to the surface, and surface smoothing. The sampling is done onto the surface of the lh and rh hemispheres of fsaverage. Note that eventhough the time series data are sampled onto fsaverage, the FC seeds are derived from the indvidual anatomy as shown below.
*STEP 4:
There are two methods of deriving a seed region:
1) To use a full-size Freesurfer parcellation from aparc+aseg.mgz, continue with STEP 5 on this page.
2) To split the full Freesurfer parcellation into multiple seeds ("split parcellation"), follow the additional steps here - and resume with step 5 on this page...
*STEP 5: Use fcseed-config to configure the parameters you wish to pass to your connectivity analysis.
Sample command: fcseed-config -segid 1010 -fcname mean.L_Posteriorcingulate.dat -fsd bold -mean -cfg mean.L_Posteriorcingulate.config
This example will use the FreeSurfer cortical segmentation for the left posterior cingulate (segID: 1010) as defined for this individual. For seed regions, we recommend generating the mean signal timecourse by using "-mean". Note that this does not perform any analysis, it just creates a text file with the configuration.
*STEP 5: Pass the config text file to fcseed-sess to generate time-course information for your chosen seed region (or for nuisance variable signal).
fcseed-sess -s sessionid -cfg mean.L_Posteriorcingulate.config
Sample cmd (mean waveforms for nuisance regressors, but PCA also possible with -pca):
for white matter:
- fcseed-config -wm -fcname wm.dat -fsd bold -cfg wm.config
- fcseed-sess -s sessionid -cfg wm.config
for ventricles + CSF:
- fcseed-config -vcsf -fcname vcsf.dat -fsd bold -mean -cfg vcsf.config
fcseed-sess -s <session> -cfg vcsf.config
- NOTE: Once a config file is created it may be used for multiple sessions
*STEP 5: Use mkanalysis-sess to setup an analysis for your FC data
Sample cmd:
mkanalysis-sess -a <analysisname>
-surface fsaverage <hemi> -notask -taskreg mean.L_Posteriorcingulate.dat 1 -nuisreg vcsfreg.dat 1 -nuisreg wmreg.dat 1 -nuisreg global.waveform.dat 1 -fwhm 5 -fsd bold -TR <TR> -mcextreg -polyfit 5 -nskip 4
Note: if you do not want to regress out the global signal, then do not include it in the mkanalysis-sess command.
*STEP 6: Use selxavg3-sess to run the subject-level analysis outlined by the above mkanalysis-sess cmd.
selxavg3-sess -s <session> -a <analysisname>
*STEP 7: Choose the contrast file (generated in each session's contrast directory) that you wish to analyze on a group level:
- # ces.mgz - contrast effect size (contrast matrix * regression coef) # cesvar.mgz - variance of contrast effect size # sig.mgz - significance map (-log10(p)) # pcc.mgz - partial correlation coefficient map
*STEP 8: To continue with a group-level analysis, try one of the methods below:
- Method 1:
- create fsgd file containing all sessions of interest
Concatenate contrast files using mri_concat
Run group analysis using mri_glmfit
Concatenate with isxconcat-sess
Run group analysis using mri_glmfit