|
Size: 2816
Comment:
|
Size: 5642
Comment:
|
| Deletions are marked like this. | Additions are marked like this. |
| Line 1: | Line 1: |
| ===work in progress...=== | |
| Line 3: | Line 2: |
| ==About== Walkthrough: How to use FsFast and fcseed-sess for functional connectivity analysis |
== About == This page describes how to perform seed-based functional connectivity (FC) analysis in FSFAST. This is an extension of the task-based analysis for which there is much more documentation. It may be worth your time to study some of the preprocessing and task-based analysis as found in [[http://surfer.nmr.mgh.harvard.edu/pub/docs/freesurfer.fsfast.ppt|FS-FAST powerpoint]] |
| Line 6: | Line 5: |
| [[http://surfer.nmr.mgh.harvard.edu/pub/docs/freesurfer.fsfast.ppt|Functional Analysis with FS-FAST]] | *STEP 1: Unpack Data into the FSFAST Hierarchy using dcmunpack (run with -help for more documentation): |
| Line 8: | Line 7: |
| *STEP 1: Unpack Data into the FSFAST Hierarchy using "unpackscmdir" | Sample cmd: |
| Line 10: | Line 9: |
| [[https://surfer.nmr.mgh.harvard.edu/fswiki/unpacksdcmdir| unpacksdcmdir]] | dcmunpack -src dicomdir/subject/ALLDICOMS -targ fcMRI_dir/subject -fsfast -run 3 bold nii.gz f.nii.gz -run 4 bold nii.gz f.nii.gz |
| Line 12: | Line 11: |
| 1.QA Check after unpacking A - Check unpacked data (time points, # of slices ..etc) B - Check FSFAST hierarchy in session folder |
In this sample command... |
| Line 16: | Line 13: |
| *STEP 2: reconstruct anatomical data using # Reconstruction Anatomical using "recon-all all" 1.Set SUBJECTS_DIR 2.QA Check A - Check talairach transformation B - Check skull strip, white matter & pial surface C - Re-run "recon-all" if edits are made D - Check hierarchy of reconstructed anatomical data [[https://surfer.nmr.mgh.harvard.edu/fswiki/recon-all recon-all]] |
* Have all fMRI dicoms linked into "ALLDICOMS" directory * Arguement for "-targ" specifies output directory * -run 3 bold nii.gz f.nii.gz will unpack run 3 fmri to fcMRI_dir/subject/bold/003/f.nii.gz * To get a list of runs, run dcmunpack -src dicomdir/subject/ALLDICOMS * Use "-fsfast" to generate fsfast hierarchy shown in the image below |
| Line 26: | Line 19: |
| 1.Make FSFAST basic hierarchy (only if data are not unpacked in FSFAST hierarchy) 2.Link to FreeSurfer anatomical analysis A - Make subjectname file in the session directory to link a subject's functional & structural data 3.Create a sessid file (text file with list of your sessions)in your Study DIR. 4.Create a Stimulus Schedule (Paradigm file) in bold folder (A "paradigm" file is a record of which stimulus was presented when & for how long. Each paradigm file has four columns: A - Stimulus onset time (sec) B - Condition ID code (0, 1, 2, ...) C - Stimulus Duration (sec) D - Stimulus Weight (usually 1) |
{{attachment:fsfast-hierarchy.jpg}} |
| Line 36: | Line 21: |
| *STEP 2: Link to FreeSurfer anatomical analysis: Create "subjectname" text file in the session directory. Write in it the subject's recon directory name (as labeld in $SUBJECTS_DIR). | |
| Line 37: | Line 23: |
| *STEP 3: Pre-process your bold data using preproc-sess [[http://surfer.nmr.mgh.harvard.edu/fswiki/preproc-sess preproc-sess]] # Preprocessing of fMRI Data () |
C. Create a sessid file (text file with list of your sessions) in your Study DIR (optional) *STEP 3: Pre-process your bold data using preproc-sess [[http://surfer.nmr.mgh.harvard.edu/fswiki/preproc-sess|preproc-sess]] Sample cmd: |
| Line 41: | Line 30: |
| 1.By default this will do motion correction, smoothing & brain masking 2.Quality Check (plot-twf-sess) 3.Examine additions to FSFAST hierarchy (in each run of bold dir): - f.nii (the raw data) - fmc.nii (motion corrected-MC) - fmcsm5.nii (MC & smoothed) - fmc.mcdat - text file with the MC parameters (AFNI) - mcextreg.bhdr - binary mask of the brain # Function-Structure Registration View unregistered tkregister-sess -s <subjid> -regheader) Run automatic registration spmregister-sess -s <subjid> Check automatic registration tkregister-sess -s <subjid> A - Make edits if needed using scale as the last resort Check talairach registration tkregister2 --s <subjid> --fstal --surf |
|
| Line 60: | Line 31: |
| A. By default this will do motion correction, smoothing & brain masking | |
| Line 61: | Line 33: |
| *STEP 4: Use fcseed-sess to generate time-course information for your chosen seed region (as well as nuisance variable signal). | B. Quality Check (plot-twf-sess) |
| Line 63: | Line 35: |
| C.Examine additions to FSFAST hierarchy (in each run of bold dir): | |
| Line 64: | Line 37: |
| *STEP 5: Use mkanalysis-sess to setup an analysis for your FC data | ||f.nii ||(Raw fMRI data) || ||fmc.nii ||(Motion corrected-MC) || ||fmcsm5.nii ||(MC & smoothed) || ||fmc.mcdat ||(Text file with the MC parameters (AFNI)) || ||brain.mgz ||(Binary mask of the brain) || |
| Line 68: | Line 45: |
| *STEP 6: Use selxavg3-sess to run the subject-level analysis | NOTE: you ''may'' need to convert the file "fmcpr.mgz" to fmcpr.nii using [[http://surfer.nmr.mgh.harvard.edu/fswiki/mri_convert|mri_convert]] Found in each bold scan dir. Sample cmd: mri_convert session/bold/002/fmcpr.mgz session/bold/002/fmcpr.nii mri_convert session/bold/003/fmcpr.mgz session/bold/003/fmcpr.nii |
| Line 72: | Line 55: |
| *STEP 7: Use mri_glmfit or selxavg3-sess to run a group-level analysis | Next, I'll outline two methods of deriving a seed region: 1) To use a full-size Freesurfer parcellation from aparc+aseg.mgz, continue with STEP 4 on this page. 2) To split the full Freesurfer parcellation into multiple seeds ("split parcellation"), follow the [[FsFastFunctionalConnectivityWalkthroughSplittingSeeds |additional steps here]] - and resume with step 5 on this page... *STEP 4: Use fcseed-config to record the parameters you wish to pass to your connectivity analysis. Sample command: fcseed-config -segid 1010 -fcname mean.L_Posteriorcingulate.dat -fsd bold -mean -cfg mean.L_Posteriorcingulate.config This example will use the FreeSurfer cortical segmentation for the left posterior cingulate (segID: 1010). For seed regions, we recommend generating the mean signal timecourse by using "-mean" *STEP 5: Pass the config text file to fcseed-sess to generate time-course information for your chosen seed region (or for nuisance variable signal). Sample cmd (mean seed region timecourse): fcseed-sess -s <session> -cfg mean.L_Posteriorcingulate.config Sample cmd (mean waveforms for nuisance regressors, but PCA also possible with -pca): for white matter: . fcseed-config -wm -fcname wm.dat -fsd bold -cfg wm.config . fcseed-sess -s <session> -cfg wm.config for ventricles + CSF: . fcseed-config -vcsf -fcname vcsf.dat -fsd bold -mean -cfg vcsf.config . fcseed-sess -s <session> -cfg vcsf.config *NOTE: Once a config file is created it may be used for multiple sessions *STEP 5: Use [[http://surfer.nmr.mgh.harvard.edu/fswiki/mkanalysis-sess|mkanalysis-sess]] to setup an analysis for your FC data Sample cmd: mkanalysis-sess -a <analysisname> . -surface fsaverage <hemi> -notask -taskreg mean.L_Posteriorcingulate.dat 1 -nuisreg vcsfreg.dat 1 -nuisreg wmreg.dat 1 -nuisreg global.waveform.dat 1 -fwhm 5 -fsd bold -TR <TR> -mcextreg -polyfit 5 -nskip 4 Note: if you do not want to regress out the global signal, then do not include it in the mkanalysis-sess command. *STEP 6: Use [[http://surfer.nmr.mgh.harvard.edu/fswiki/selxavg3-sess|selxavg3-sess]] to run the subject-level analysis outlined by the above mkanalysis-sess cmd. . selxavg3-sess -s <session> -a <analysisname> *STEP 7: Choose the contrast file (generated in each session's contrast directory) that you wish to analyze on a group level: # ces.mgz - contrast effect size (contrast matrix * regression coef) # cesvar.mgz - variance of contrast effect size # sig.mgz - significance map (-log10(p)) # pcc.mgz - partial correlation coefficient map *STEP 8: To continue with a group-level analysis, try one of the methods below: Method 1: *create fsgd file containing all sessions of interest *Concatenate contrast files using [[http://www.freesurfer.net/fswiki/mri_concat|mri_concat]] *Run group analysis using [[http://www.freesurfer.net/fswiki/mri_concat|mri_glmfit]] Should also be possible with: Method 2: *[[http://www.freesurfer.net/fswiki/Qdec|Qdec]] Should also be possible with: Method 3: *Concatenate with [[http://www.freesurfer.net/fswiki/isxconcat-sess|isxconcat-sess]] *Run group analysis using [[http://www.freesurfer.net/fswiki/mri_concat|mri_glmfit]] |
About
This page describes how to perform seed-based functional connectivity (FC) analysis in FSFAST. This is an extension of the task-based analysis for which there is much more documentation. It may be worth your time to study some of the preprocessing and task-based analysis as found in FS-FAST powerpoint
*STEP 1: Unpack Data into the FSFAST Hierarchy using dcmunpack (run with -help for more documentation):
Sample cmd:
dcmunpack -src dicomdir/subject/ALLDICOMS -targ fcMRI_dir/subject -fsfast -run 3 bold nii.gz f.nii.gz -run 4 bold nii.gz f.nii.gz
In this sample command...
- Have all fMRI dicoms linked into "ALLDICOMS" directory
- Arguement for "-targ" specifies output directory
- -run 3 bold nii.gz f.nii.gz will unpack run 3 fmri to fcMRI_dir/subject/bold/003/f.nii.gz
- To get a list of runs, run dcmunpack -src dicomdir/subject/ALLDICOMS
- Use "-fsfast" to generate fsfast hierarchy shown in the image below
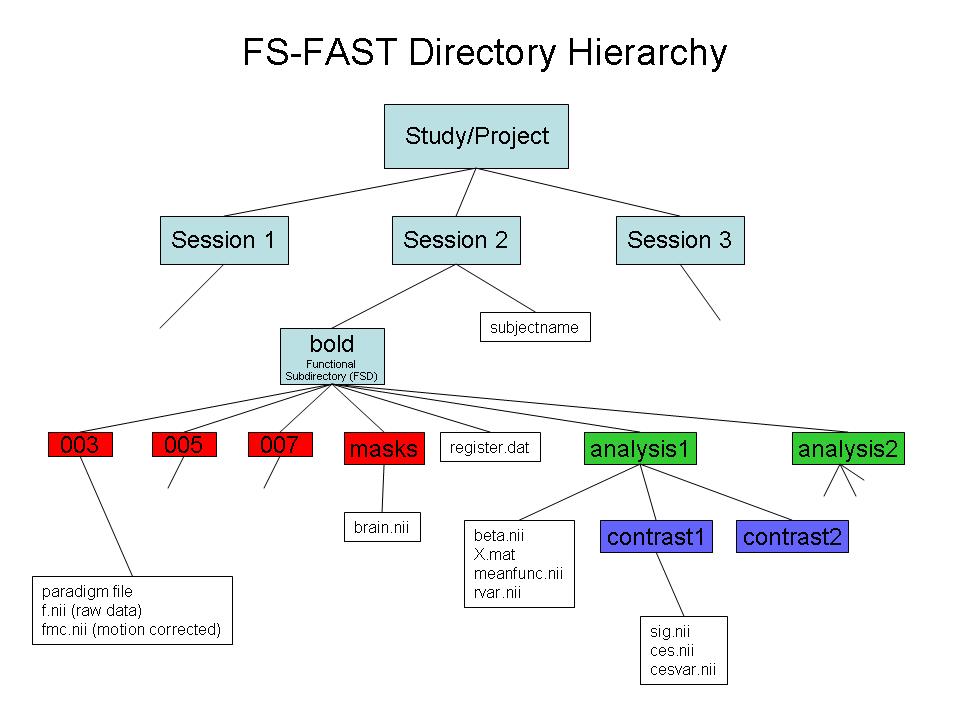
*STEP 2: Link to FreeSurfer anatomical analysis: Create "subjectname" text file in the session directory. Write in it the subject's recon directory name (as labeld in $SUBJECTS_DIR).
C. Create a sessid file (text file with list of your sessions) in your Study DIR (optional)
*STEP 3: Pre-process your bold data using preproc-sess preproc-sess
Sample cmd:
preproc-sess -s <subjid> -fwhm <#>
A. By default this will do motion correction, smoothing & brain masking
B. Quality Check (plot-twf-sess)
C.Examine additions to FSFAST hierarchy (in each run of bold dir):
f.nii
(Raw fMRI data)
fmc.nii
(Motion corrected-MC)
fmcsm5.nii
(MC & smoothed)
fmc.mcdat
(Text file with the MC parameters (AFNI))
brain.mgz
(Binary mask of the brain)
NOTE: you may need to convert the file "fmcpr.mgz" to fmcpr.nii using mri_convert
Found in each bold scan dir. Sample cmd:
mri_convert session/bold/002/fmcpr.mgz session/bold/002/fmcpr.nii
mri_convert session/bold/003/fmcpr.mgz session/bold/003/fmcpr.nii
Next, I'll outline two methods of deriving a seed region:
1) To use a full-size Freesurfer parcellation from aparc+aseg.mgz, continue with STEP 4 on this page.
2) To split the full Freesurfer parcellation into multiple seeds ("split parcellation"), follow the additional steps here - and resume with step 5 on this page...
*STEP 4: Use fcseed-config to record the parameters you wish to pass to your connectivity analysis.
Sample command: fcseed-config -segid 1010 -fcname mean.L_Posteriorcingulate.dat -fsd bold -mean -cfg mean.L_Posteriorcingulate.config
This example will use the FreeSurfer cortical segmentation for the left posterior cingulate (segID: 1010). For seed regions, we recommend generating the mean signal timecourse by using "-mean"
*STEP 5: Pass the config text file to fcseed-sess to generate time-course information for your chosen seed region (or for nuisance variable signal).
Sample cmd (mean seed region timecourse):
fcseed-sess -s <session> -cfg mean.L_Posteriorcingulate.config
Sample cmd (mean waveforms for nuisance regressors, but PCA also possible with -pca):
for white matter:
- fcseed-config -wm -fcname wm.dat -fsd bold -cfg wm.config
fcseed-sess -s <session> -cfg wm.config
for ventricles + CSF:
- fcseed-config -vcsf -fcname vcsf.dat -fsd bold -mean -cfg vcsf.config
fcseed-sess -s <session> -cfg vcsf.config
- NOTE: Once a config file is created it may be used for multiple sessions
*STEP 5: Use mkanalysis-sess to setup an analysis for your FC data
Sample cmd:
mkanalysis-sess -a <analysisname>
-surface fsaverage <hemi> -notask -taskreg mean.L_Posteriorcingulate.dat 1 -nuisreg vcsfreg.dat 1 -nuisreg wmreg.dat 1 -nuisreg global.waveform.dat 1 -fwhm 5 -fsd bold -TR <TR> -mcextreg -polyfit 5 -nskip 4
Note: if you do not want to regress out the global signal, then do not include it in the mkanalysis-sess command.
*STEP 6: Use selxavg3-sess to run the subject-level analysis outlined by the above mkanalysis-sess cmd.
selxavg3-sess -s <session> -a <analysisname>
*STEP 7: Choose the contrast file (generated in each session's contrast directory) that you wish to analyze on a group level:
- # ces.mgz - contrast effect size (contrast matrix * regression coef) # cesvar.mgz - variance of contrast effect size # sig.mgz - significance map (-log10(p)) # pcc.mgz - partial correlation coefficient map
*STEP 8: To continue with a group-level analysis, try one of the methods below:
- Method 1:
- create fsgd file containing all sessions of interest
Concatenate contrast files using mri_concat
Run group analysis using mri_glmfit
Concatenate with isxconcat-sess
Run group analysis using mri_glmfit